
Getting it right the first time is one of our top goals for new clients. Set your art up so it is ready to be printed and sold without the hassle of sending it back and forth 8372394 times. Just run through these few simple steps and you're good to go!
First, some terminology!
- Bleed: typically the most exterior part of the file, that is intended to be cut off to insure no weird white edges or lose of edge design in the cutting process. See our blog about the different types and what to do!
- Resolution: This is the quality of the amount of pixels/dots that exist in your file. When we say, make sure you are at a high resolution such as 300 dpi or higher, that means there are more dots/information in your file which will create crispy lines and colors
- Dimensions: The length and width of your file
- File Type: the extension after the "." on your saved file. Preferred are .psd for photoshop documents, .ai for illustrator documents, and .pdf for scanned documents or software where .psd is not available. We do allow .TIFF if you have a very large file that is going to take up quite a bit of storage.
- Aspect Ratio: The width of the file in relation to the height of the file. I.e, 4:1 is the width is 4 times the size of the height
Step One: Creating your file
If you haven't started your digital piece, then awesome! This will be a breeze. If it is already completed, don't sweat. I will get to you next.
Starting from scratch: You will need to create a new canvas or file on your preferred drawing software. In the prompt box, put the dimensions you want in the appropriate areas. Vertical pieces should have a smaller width and a longer height, and vise versa for a horizontal print. Add .25" to both the height and width to account for the bleed! Under the dimension area, there will be a box to input resolution. You need to put at least 300 in this box. **Illustrator does not have a resolution area because vector files are automatically 300 dpi!

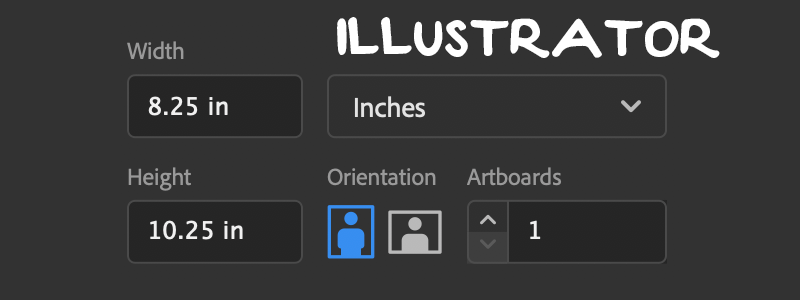
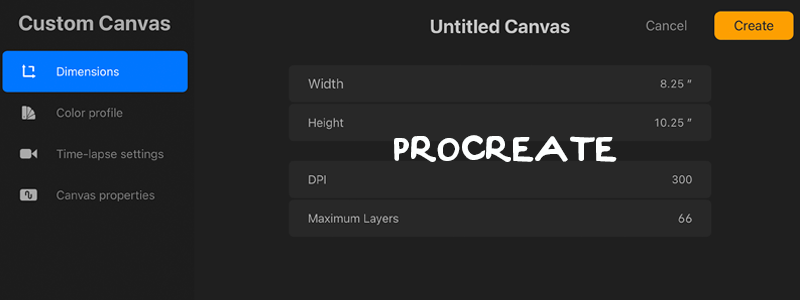
These examples are for a final print size of 8"x10"
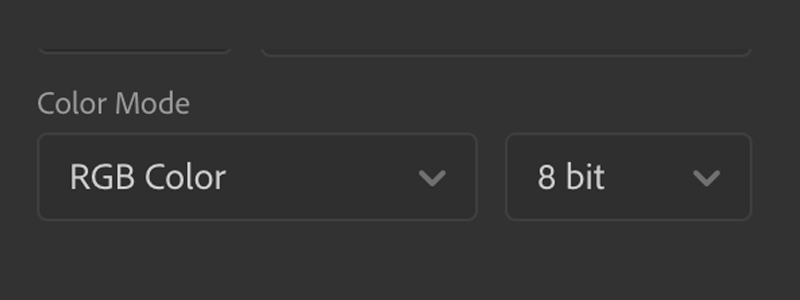
Important note: If you are using Adobe software, please be mindful of your color mode! You can adjust this after the fact, but some colors are different in CMYK vs RGB. Our print run modes for Giclee & Stickers are set up automatically for RGB, but you can print in CMYK. All promo items such as business cards & flyers must be in CMYK before submitting! Those are done on a different printer and we can't shift color modes on that printer. You can also purchase our ICC profiles for the giclee papers, and apply them to your print file.
Once you have the file dimensions and resolutions set, get to work! We recommend using your layers for different aspects of the piece, the background should always be on its own layer!
Starting with existing work: In photoshop and illustrator, it is pretty easy to adjust your image size. If you created a piece not in the size you want, just edit in the image size or transform window. This is only if your original is at 300 dpi, just at the wrong dimensions. If you need to increase the dpi, drop your work into a new canvas at the correct resolution and dimension (with the .25" bleed added). Then from there, enlarge the work and clean up any pixelated lines or missing information.
If your aspect ratio is off and it is sizing wonky or not to the complete dimensions, then either look for a similar size ratio. For example, a 11"x14" won't size down correctly to an 8"x10", but a 16"x20" will.
Step Two: Confirming Text Safety and Bleed
Two important things to remember! All important imagery, text, and logos need to be inside the text safety, and the background or border extends to the bleed. You can check this by using the rulers and guide functions of your desired software. Each side of the bleed should be 1/8", as well as an additional 1/8" inside from the cut line for text safety. More tips and tricks on text safety and bleed can be found here.
Step Three: Saving Your File
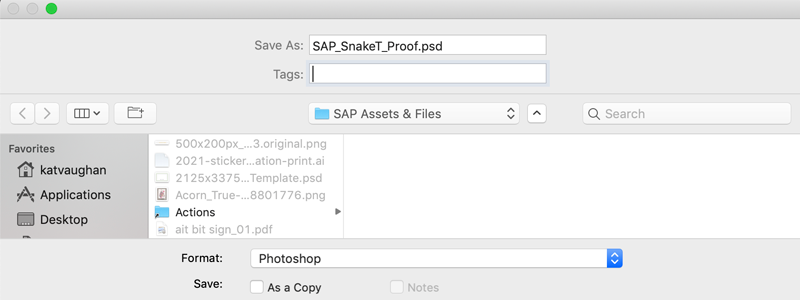
GIVE YOUR FILE A NAME! We have 600+ "untitled artwork" from past orders, if we need to find the exact original file you sent for whatever reason, it is hard to sift through them all. We recommend a naming sequence, for example "YourName_Description or Image Name". You could do just your last name, or first initial last name. Save the file with the appropriate name and file type
In procreate, you can do this at the initial setup screen, but if you made it this far without doing that then just tap the name in your gallery and the keyboard will pop up.
Acceptable file types to use:
- .psd (photoshop and procreate)
- .ai (illustrator)
- .pdf (flattened, non layered files or files not made in adobe software)
- .tiff (large files with a lot of layers, where the .psd or .ai is too large, but this should be a copy not original)
- .jpeg (if you absolutely must, but generally they lose information over time)
Not acceptable:
- .png (they always save at 72 dpi at the wrong dimensions. Bad compression, only useful in web only instances)
- .doc, .exe, and other Microsoft only extensions
- .HEIC (iPhone photos, they are never the right dimensions or resolution)
Now you're all set! We do have templates available for all promo and giclee print sizes, which would save you time in the future.