
You always see & hear the term "bleed" when it comes to printed work, let's walk through what the hell we are talking about.
What is a bleed?
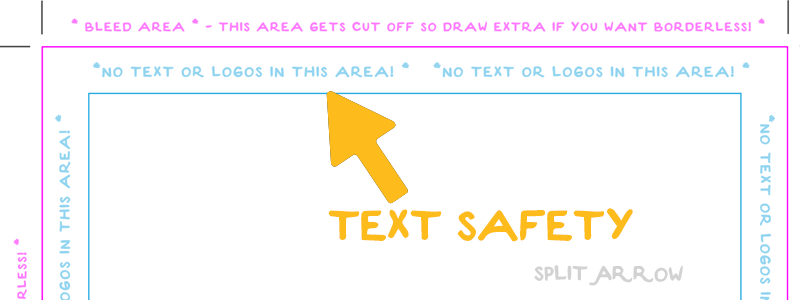
There are a couple of different types of bleed. A full image bleed is when the background or the edge of your file extends past the final cut size. A text safety is an interior buffer from the final print size that keeps all text or important imagery a safe distance away from the edge, keeping it mostly in the same spot on each print during cutting.

Why do I need one if it is just going to be cut off?
Since there is always a chance something could shift during cutting, a bleed insures you don't end up with a random white edge or important information cut off. This applies for all cutting methods, including hand cut large prints. When designs, logos or text are close to the edge of the print, there is a chance part of it could be cut off. In turn, you would lose part of the final piece. Also, some printers will print slightly offset as the sheets come out of the printer, commonly known as tracking. This is more common in high volume printers and double sided projects, but it can even happen with your at home printer! The feet in the printer pull the paper through as the print heads pass the top of the paper, and sometimes the feet pull a sheet a little to slow or a little too quickly. This is what causes a shift in either the vertical or horizontal direction, depending on how the printer feeds the paper.
What size bleed is needed?
The margin of error is about 1/16th of an inch, so if there is a shift it isn't obvious. However, we require 1/4" exterior bleed and/or 1/4" text safety on all files so we have plenty of room away from the art/important info.
Digital fractions are:
- 1/16" = .0625
- 1/8" = .125
- 1/4" = .25
- 1/2" = .5
- 3/4" =.75
Can I make a bleed after I make the art?
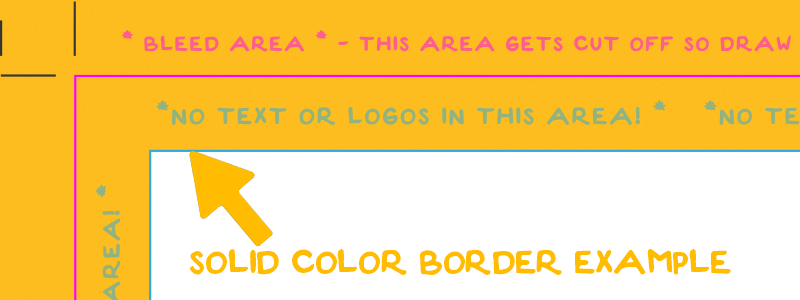
The short answer is yes, depending on the complexity of the edge or background of your print. If you have important designs on a physical piece that almost touch the edge of the print cut size, we recommend creating a print border on the digital file. This could be a white or solid color border. We are partial to white borders, they generally look cleaner, but it's up to you. If it is a full image on a digital platform, it is super simple to extend your canvas size and then adjust the background layer to extend into the bleed. If you made a full image painting on a physical medium that is at the exact size you want to print, you will have to either digitally recreate a bleed by extending the digital canvas size and cloning in the background to fit or add a border.
Do solid color or white borders need to extend into the bleed area?
Solid color borders do need to extend out into the bleed area, white borders do not.
When do I need to use them?
Two main scenarios here:
- On any product that is going to be print and then cut after printing. All our products are cut after printing, so we require them on all files.
- Digital books or digital projects that need a specific format or layout. Especially when it comes to image and type setting.
Isn't it the printers job to make my bleed?
Not exactly. While we can get as close as we can by assuming information and editing the file, there could be a weird unpainted edge hiding on the sides or blemish that shows up on the edge of the print by recreating information that already exists. It is not guaranteed to be seamless or smooth since we only have a small amount of information to work with. It is best to plan ahead and make all your work with bleed or a border in mind. Plus you don't have to worry about rejected artwork, or having a print that looks a little weird. If you really want us to edit the edge of your work to extend to the edge of the bleed, you will need to select the file editing option under the section "is your file print ready?" However, we can absolutely add a border for you for free of charge.
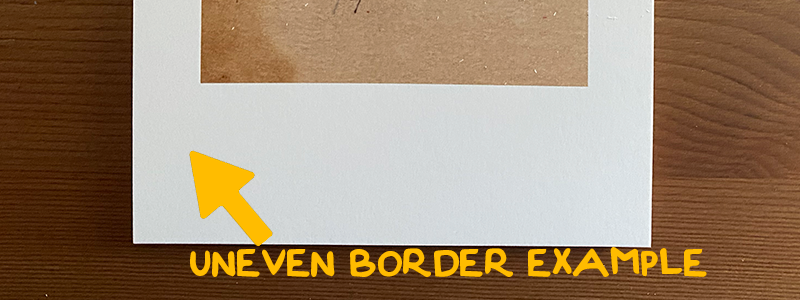
Can I make the border different sizes on each side?
When it comes to a white border or a border that is not part of the artwork, absolutely! Some artists prefer a larger border on the bottom of the final print, which leaves room for editioning and signatures. This is especially true if the final intent is to have customers frame their pieces. If you have a painted background on a physical medium, it is hard to do this after you have already finished your artwork. If you made your piece on a digital platform, you can just move the layer with the design or text where you want it to print.
What is the smallest size border I can get away with?
The smallest border we recommend is 1/8th of an inch, which is .125in. Anything smaller looks like student work or will not cut evenly.
Ultimately, you should want to make sure your file is ready the first time. Robots like printers and electric cutters or plotters can be like people and make mistakes, just typically smaller ones compared to humans! We want to get your order to you as quickly as possible, and one of the biggest hang ups at the start is bleed issues!